All of my youtube videos in one place. Aren’t you lucky!?
-

McDonald's Double Cheeseburger But CHEAPER!
Following on from my last McDonald's copycat, this week we are tackling the classic double cheeseburger. Currently on the savers menu for £2.29 (as of July 2025), it's pretty cheap in it's own right. But I'm not going to take that lying down, so with a little bit of clever shopping, I've got these down to around £1 each!
To make the double cheeseburger you will need:
Makes 4
500g of 20% or 25% minced beef
4 burger buns
8 cheese slices
1 small onion
Gherkins
Mustard
Ketchup
Method:
Make the burger patties
Weigh out the mince into 62g portions and form them into balls with your hands, this should make around 8 balls. Make sure you don’t press the balls together too hard, just gently form them. Otherwise if you over-work the beef they will become tough and dense.
Form each patty by pressing out each ball with your hands or using a burger press. You want them quite thin around the thickness of a £1 coin, and make sure they are wider than your buns to allow for shrinkage. Stack them up with a piece of baking paper in-between each patty and place them in the fridge until needed.
Do your prep
Get everything sliced and diced, as these burgers come together really quickly. Dice the onion nice and fine, and slice your pickles.
Also toast your buns by lightly buttering each half and placing them butter side down in a dry pan for a minute or so. You want a nice golden brown colour on them but not burnt.
Make the burgers
Take a frying pan and get it nice and hot, you almost want to see smoke coming off it. You shouldn’t need any oil as there will be enough fat in the beef. Add in each patty - you may need to do this in batches - and season one side with salt and pepper.
Cook on one side for about a minute before flipping over and adding one slice of cheese to each patty. Leave to cook again for around one minute.
Next, turn the heat off and stack one patty on top of the other. The residual heat in the pan should melt the cheese nicely.
Assemble your double cheeseburger!
Lay the double patty on the bottom half of your toasted bun. Then add mustard, ketchup, diced onion and pickles to the underside of the top bun. Then simply slap it on top of your burger, and enjoy!
Serve with fries or enjoy on it’s own!
-
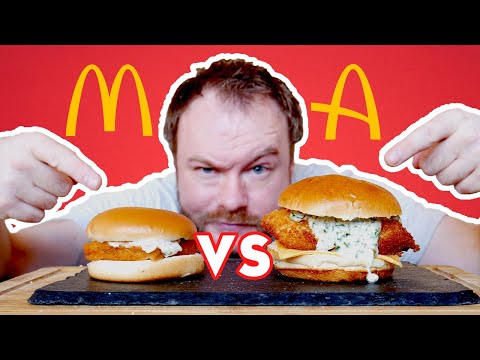
How to make a Filet O Fish but BETTER than McDonald's and a Homemade tartare sauce to boot!
The McDonald's filet-o-fish is arguably one of the most divisive and much maligned menu items the chain has to offer. It's the marmite of the McDonald's world, you either love it or you hate it.
Before making this video I can honestly say I'd never tried a filet-o-fish before, and after giving the McDonald’s version a taste...I won't be trying it again. It was pretty bland, uninspiring and the fillet of fish itself was pretty mushy and unpleasant. Also, as you will see in this video the sandwich looked like it was assembled by a drunk! So I figured I could easily make a filet-o-fish...but way better! I used some nice fresh cod, fried in panko breadcrumbs for that awesome crunch. A fresh homemade tartar sauce as well.
McDonald's steam the buns for theirs, but I used brioche buns which are very soft anyway, so I didn't need to do that step. If you like the McDonald's filet-o-fish then you're going to LOVE my version.
To make my filet-o-fish that's better than McDonald's you will need:
For the tartar sauce:
About 4 tbsp of mayonnaise
1 tbsp of chopped gherkins (dill pickles)
1 tbsp of chopped capers
Juice of 1/4 of a lemon
About 2 tbsp of chopped parsley
About 1 tbsp of chopped dill
Salt & pepper
For the filet-o-fish (there's enough breadcrumbs/flour to make about 4 sandwiches
2-4 skinless cod loins
50g of panko breadcrumbs
50g of plain all purpose flour
Salt & pepper
Oil for frying
Processed American cheese
Brioche buns
Method:
Prepare the tartare sauce
Chop the pickles, capers, parsley and dill and add to a mixing bowl along with the mayonnaise a pinch of salt and the lemon juice.
Mix well, cover it with cling film and leave in the fridge until needed. A good tip is to leave it for a good hour to let the flavours develop.
Breading the filet-o-fish
First take your cod fillets and lightly season with salt
Then set up your breading station by adding the flour, breadcrumbs and cracking the eggs into 3 separate bowls.
Then take each piece of fish and lightly dust in the flour, shake off any excess, then lightly dip into the egg, and finally into the panko breadcrumbs. Make sure to lightly press the breadcrumbs into the fish for better contact. Place the fish on to a plate and repeat with the other piece.
To fry the fish
Take a large frying pan and add around half an inch of sunflower or vegetable oil. We are going to shallow fry these so don’t add too much oil.
Once the oil is at a medium heat, gently place the breaded fish into the oil laying away from you to avoid being splashed with hot oil!
Gently fry them for around 4-5 minutes each side until cooked all the way through, and the coating is nice and golden. Times will vary depending on the thickness of the fish. You can also use a probe for more accuracy. Once cooked take them out and place on kitchen paper to soak off any excess oil.
Assemble the filet-o-fish!
Take the bottom half of your bun, and place a slice of American cheese on top. Yes that’s right McDonald’s a WHOLE slice not a piddly half slice!
Place one of the fish pieces on top of the cheese, then slather over as much of the tartare sauce as you like before placing on the top half of the bun.
Enjoy with some fries and there you have my version of the classic McDonald’s Filet-o-fish!
-

McDonald's Sausage & Egg McMuffin But CHEAPER And BETTER
The McDonald's sausage and egg McMuffin is an iconic breakfast menu item. It has been feeding people since 1975 and It’s incredibly popular. But...In the UK at least it's currently £3.39 for a double! For ONE single muffin. That can really mount up to quite an expensive breakfast especially if you take the whole family. So I have revived my old recipe, so you can easily make the iconic sausage and egg mcmuffin at home for a fraction of the cost. A tip for you, once the patty mix has been combined, take a pinch off and fry it. Taste it, and if you want more salt, herbs, pepper you can add more before forming into patties.
To make my double sausage and egg McMuffin you will need:
Makes 4 doubles
500g pork mince 12% fat
4 Cheese slices
4 eggs for frying
4 breakfast Muffins
1/2 tbsp of onion powder
1/2 tbsp dried sage
1 tsp of fresh or dried thyme
1 tsp salt
1 tsp black pepper
Method:
Make the sausage patties
Add the pork mince to a mixing bowl and add the onion powder, sage, thyme and a little salt and pepper. Mix well, and fry off a small piece in a pan and taste for seasoning. Add more salt and pepper if needed.
Once the mixture is well combined and you are happy with the seasonings, weigh the mixture out into balls of around 62g each. This should make about 8 balls.
Form each ball into a patty by pressing them out flat, making sure they are a good half an inch bigger than the width of your muffins. This allows for any shrinkage, and means your patty will fit nicely in the finished muffin.
Place each patty in-between a square of baking parchment and store in the fridge for when you need them. They also freeze really well too.
Toast the muffins
This recipe will make around 8 singles or 4 doubles, so work out how many muffins you need and cut each one in half.
Spread a small amount of butter or oil on to each side of the muffin, and toast in a medium hot dry pan until lightly toasted. Place a slice of American cheese on the base part of the muffin and set to one side.
Fry off the patties
Take a large frying pan and put onto a medium high heat. Once hot, add your sausage patties and fry off for around 1-2 minutes each side. You want a nice golden brown crust to form on each side as that equals flavour.
Once the patties are cooked and still piping hot, lay 1 or 2 on top of the cheese. This will start to melt it, making it nice and gooey.
To finish up!
Using the same pan, put it back on the heat and add a little oil if needed.
Crack in however many eggs you need, but you may need to do this in batches depending on how many you are making. Fry the eggs for about a minute, basting the top to set it but making sure the yolk stays runny.
Then simply top the patties with the fried egg, pop the lid on and enjoy!
These are great for breakfast, lunch or enjoyed on park bench at 3am as you ponder your life choices!
-
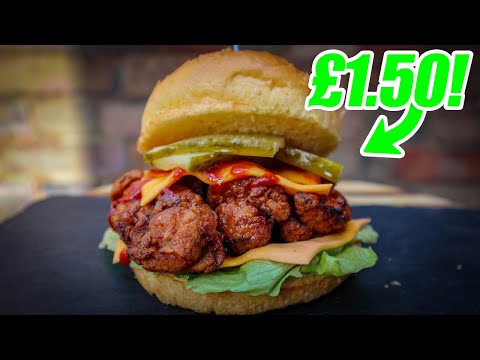
The CHEAPEST Fried Chicken Sandwich You Will Ever Make!
Fried chicken is probably my favourite of all the fast foods. When I hear the mere mention of fried chicken I have to get some. Now don't get me wrong, I love the old colonel but it can be a bit pricy, especially if you're a greedy pig like me. So I've got a really simple, cheap and tasty fried chicken sandwich you can make at home for just £1.50 each! So not only are you getting hot & fresh tasty fried chicken, it's also not going to break the bank, which is a god send for us all right now.
I opted for breasts, but if you want to make this even cheaper, you can use boneless thighs. You can also use whatever condiments, salad, cheese etc you like.
To make my fried chicken sandwich you will need:
Makes 4
For the marinade
2 medium sized chicken breasts
5-6 tbsp of plain natural yoghurt
2 garlic cloves
1/2 tsp white pepper
1 tsp dried sage
1 tsp chilli powder
1/4 tsp MSG
1/2 tsp salt
About 50ml of juice from the pickles (or lemon juice)
For the seasoned flour
5-6 tbsp of plain flour (all purpose)
1 tsp white pepper
2 tsp garlic granules
1 tsp chilli powder
1 tsp smoked paprika
2 tsp dried sage
1/2 tsp MSG
1 tsp salt
Oil for frying
Extras
4 brioche buns
Cheese slices
Lettuce
Mayonnaise
Pickles
Sriracha
Honey
Method:
Prepare the chicken
Cut the chicken breasts into tender sized strips and place into a bowl. Add the minced garlic and add the pepper, sage, chilli powder, MSG, salt, the yoghurt and pickle juice.
Mix everything together until well combined. Then cover the bowl with cling-film, and pop in the fridge for a good 1-2 hours. This helps tenderise the chicken and makes sure all those herbs and spices get deep into the chicken.
Make the flour dredge
Get yourself a big container with a lid and add the flour, pepper, garlic granules, chilli powder, smoked paprika, sage, salt and MSG. Then mix that all together ready for dredging.
Coat the chicken!
After the chicken has had a good hour or two in the fridge, take it out and add the chicken pieces to the flour dredge. Make sure to shake off a little of the yoghurt mix so the flour doesn’t become too wet.
Once you’ve added all of your chicken pieces to the container, place the lid on tightly and give it a good shake about. This is a great way to coat the chicken as it means you don’t have to get your hands dirty, and it gives the chicken a nice even coating. Once the chicken has been fully coated in the seasoned flour they are ready to go.
Fry the chicken
Take a frying pan and add about half an inch of vegetable or sunflower oil. Heat the pan up to a medium heat, being careful it’s not too hot else the coating on the chicken will burn.
Add your chicken pieces to the pan laying away from you. Fry in batches for around 2-3 minutes each side until cooked through and the coating is nice and golden brown.
Once cooked take the chicken out of the pan and place on a wire rack to drain off any excess oil. Leave to cool slightly as they will be hotter than the devils arse crack!
Assemble the sandwich
Take the bottom half of your bun (you can toast them first if you like). Add some mayo, lettuce a slice of cheese then top with a couple of those fried chicken strips.
Finally add a little sriracha or chilli sauce, a drizzle of honey and a couple of pickles. Add the top half of your bun and away you go!
Serve with fries and a big fat milkshake or enjoy on It’s own
-

What makes the perfect burger?....
A really good burger is in my view one of the greatest pleasures on this planet. It's a perfect delivery system of meat cheese and carbs. When done right it's incredible, but when done badly there's nothing worse. A good burger needs a few things, good beef, a proper bun, the right cheese and also the right accompaniments. Follow the steps I show you in this video, and you'll get a proper good burger at the end of it.
To make the perfect burger you will need:
Good quality minced beef 80% beef 20% fat
Brioche, potato or soft white buns
Plastic burger cheese! none of your fancy stuff!
Red onion
Ketchup and American mustard
Pickles
Mayo or butter for toasting
Salt and black pepper (nothing else)
Method:
The patties
Start with a good quality beef mince with around 20% fat to 80% beef. This helps keep the burger patties nice and juicy and impart flavour.
Form the beef into balls before gently pressing them into patties. Be careful not to over work the beef, because if you do that then the patties will become dry and dense. You can stack up the patties by placing them in-between squares of baking parchment and freezing them for a later date.
Less is more with seasoning! Yes you can add garlic, onion powder, cayenne, paprika etc etc. But really, you want to taste the beef not the spices. So I tend to use just salt and pepper, keep it simple and you’ll get a much better burger.
The bun
There seems to be a fashion for using brioche buns these days, and whilst I have used them many times before I’ve kind of gone off them recently. I think a nice soft potato bun or just a soft bread roll is much better than brioche. You could also use a nice sesame seeded bun too.
Toast or not to toast? That is the question. It really doesn’t matter and it boils down to personal preference. I like mine toasted just for that extra bit of flavour and texture, but you do you.
Condiments and toppings
Cheese is just as important as the patty in my opinion, unless you hate cheese then I think It’s the glue that holds the burger together. And using that plastic orange squared burger cheese is an absolute MUST in my opinion. Don’t ask me why, but it just really works, no other cheese comes close to working as well in a burger and It’s a hill I will die on. Save your fancy cheeses for the cheese board.
Pickles are also essential, unless you really don’t like them then leave them out. They add a sweetness and acidity to what is a really fatty thing to eat. They just cut through all that meat and cheese.
Sauces I like to keep simple, ketchup and mustard are the gold standard for a cheese burger and I like to keep it that way. You can also add a burger sauce or relish too if you like. The idea is again to add some sweetness, acidity and a little bit of heat from the mustard. They all work together to create meaty cheesy harmony.
As for salads, I tend to leave out tomato unless they are in season. There is nothing worse than an out of season insipid wet tomato flopping around in your burger, it offers no value at all and they are better off in the bin. Stick to a bit of fresh red onion and a crisp lettuce like cos or iceberg, and you won’t go far wrong.
Watch the video and you’ll get a great foundation for making the best burger of your life. As with most things you cook you are looking for that balance and those four key flavours of salt, fat, sweetness and acid. Get those four flavours into your burger in the right amounts, and you will end up with a fantastic burger at the end of it. Promise!
-
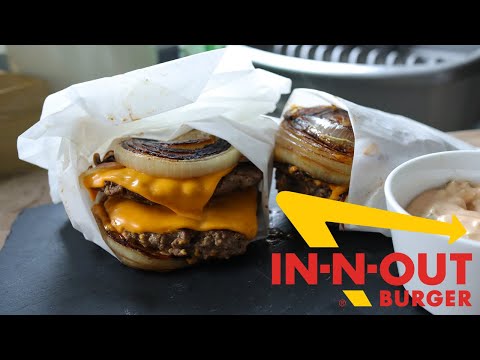
The Viral In-n-Out Flying Dutchman Burger....Good Or Gimmick?
I've seen this burger all over my tiktok fyp recently, so I thought I'd give it a go to see if the flying Dutchman burger is actually any good or just a gimmick. The flying Dutchman is a burger produced by a popular U.S based burger chain called in-n-out. Apparently only available on their 'secret menu' it's basically a double cheeseburger with rounds of grilled onions as the 'bun' instead of a bread bun. So let's give it a bash! and see if it's worth the hype!
To make the flying Dutchman you will need:
Makes 2 doubles
For the sauce
5 tbsp of mayo
About 3 tbsp of ketchup
1/2 tsp garlic granules
1 med sized gherkin, diced small
1 tsp of mustard
For the burgers
500g of beef mince made into 4 patties
1 absolutely massive onion (You may have to search around, but I find the independent foreign supermarkets seem to stock huge onions. Make a day of it lol)
6 slices of processed cheese
Salt & pepper to taste
1 tbsp of oil or lard
Method:
Make the sauce
Add the mayonnaise, ketchup, garlic granules, diced gherkin, a pinch of salt and mustard to a bowl and mix well.
Cover, and leave in the fridge for a good half an hour. Burger sauces like this really benefit from sitting for a while to improve the flavour.
Cut your onion
Take a huge onion the size of a babies head and cut 4 big disks from the centre of the onion, around ¾ of an inch thick.
Make your patties
Form your beef into equal sized balls, then press each ball out into a patty slightly larger than the circumference of the onion slices. This allows for shrinkage.
Season each patty with salt and pepper on each side
To make the flying Dutchman
First take a frying pan or skillet and add 1 tbsp of oil or lard and turn the pan on to a medium high heat.
When the pan is hot carefully add your onion rounds and fry them for around two minutes on one side. Be careful not to move them around too much otherwise they will fall apart. Once one side is nice and caramelised and starting to go soft, very gently flip them and do the same on the other side.
Once cooked and nicely caramelised, take them out and keep on a plate to one side.
With the pan back on the heat, add your burger patties and fry on a high heat for 1-2 minutes each side. You want a nice golden crust, and the burgers to be fully cooked. Once cooked take them out and put to one side
Now take the pan off the heat and add your onion slices back in and place a slice of cheese on just two of the onion slices.
Next add a beef burger patty on top of each of the sliced onions with the cheese on, another slice of cheese on top of that, then the other burger patty and finally the other slice of cheese! JFC!
Lastly, add the other slices of onion on top of each burger, pop a lid over the pan and just allow the cheese to melt a little. Your flying Dutchman burgers are now ready.
I suggest wrapping them up in baking paper to prevent spillage because these are messy to eat, but so so good! Splodge over some of that burger sauce we made earlier and you’ll be in meat and cheese heaven.
-

This Chicken Kiev Burger Is INSANE!.....
There are two things in life that you can guarantee will make you happy. Getting laid, and eating a fat juicy burger. Now whilst I can't guarantee the first of the two things, I can guarantee the second. Today I took the concept of a burger and combined it with the garlicky deliciousness of the chicken kiev to create the well, chicken kiev burger!
To make my chicken kiev burgers you will need:
4 small-medium chicken breasts (or thighs)
250g unsalted butter or butter spread
2-3 garlic cloves
A good handful of chopped parsley
4 seeded burger buns
2 eggs
About 4 tbsp of plain flour
About 8 tbsp of breadcrumbs
1 lime (juice only)
Salt & pepper
Oil for frying
Toppings (you can add whatever you like, but this is what I added
Sliced red onion
Pickled jalapenos
A little mayo
Little gem lettuce
Method:
Make the garlic butter
To a bowl add the softened butter, minced garlic and chopped parsley. Add a pinch of salt and mash the butter into a paste then place to one side or in the fridge.
Make the breaded chicken cutlets
Take the chicken breasts and remove any sinew, chewy bits, cartilage etc and remove the mini fillet (save it for something else).
Place each chicken breast in-between 2 pieces of cling film and beat each breast flat until it's about the thickness of a £1 coin and a uniform thickness all over.
Crack the eggs into a bowl and add a pinch of salt. This helps loosen the eggs slightly making them easier to work with when breading. In two separate bowls add the flour and breadcrumbs, and season the flour lightly with salt & pepper.
Take each chicken breast and dip into the flour first, shaking off any excess, then into the egg, then finally the breadcrumbs. Pack the breadcrumbs on well, then place both chicken breasts to one side ready for frying.
Do your mise en place!
Get any toppings, sauces etc ready before you fry the chicken. This makes life so much easier when assembling your burger.
At this point too, you can lightly toast your buns if you so wish. I did mine by lightly buttering the bun halves and frying gently in a medium hot dry pan until a light golden brown.
Fry the chicken
To a frying pan add about 2 tbsp of oil such as sunflower, vegetable or rapeseed and bring to a medium heat.
Add your chicken cutlets to the pan facing away from you to avoid splashing hot oil on yourself. Don’t mess around with hot oil people, it will mess you up!
Fry the cutlets for around 3-4 minutes each side until the chicken is cooked through, and the breading is a nice golden colour.
Once the chicken is almost cooked through, add a couple of tbsp of your garlic butter to the pan and as it melts, baste the chicken cutlets just for the last minute or so.
Next, remove the chicken cutlets from the pan and leave to rest on your cutting board or a warm plate just for a minute to allow the juices to get back into the chicken and for the muscle fibres to relax. That’s how you keep your chicken nice and juicy!
Assemble your chicken burger
Add your salad, sauces etc to the bottom part of your bun, then lay on top one of the chicken cutlets.
the add a little more of that garlic butter, before squeezing over a little lemon or lime juice. This really cuts through some of that richness.
Finally add some sliced red onion, add the top of your bun and enjoy!
Serve with fries or enjoy on it’s own!
-

The STEAK sandwich to end ALL other steak sandwiches!
If you're tired of steak, then you're tired of life my friend. Imagine, you wake up in the morning and you're presented with this beefy, cheesy, eggy wonder that is my breakfast steak sandwich. Don't settle for cereal, toast or some BS granola and berries. Make this, and start your day with a bang!
Admittedly you are not going to have this steak sandwich every day. Because let's face it, it's not exactly 'health food' is it now, so treat it as a....treat! The key to making a great steak sandwich starts with the steak itself. I used a nice dry aged sirloin, but use whatever steak you prefer. A simple marinade of garlic, pepper and some cayenne is all you need.
Don't add too many flavourings as you'll mask the taste of the beef. Of course I'm also using that processed cheese rubbish, because it just works doesn't it. I know I know it's not real cheese, but it melts so well, it has a cheesy saltiness, and no other cheese works as well in my opinion. Save your fancy aged cheddars for the cheese board.
To make my breakfast steak sandwich you will need:
About 450g of sirloin steak thinly sliced
About 150g of pre cooked new potatoes
2 brioche buns or burger buns
Sliced red onion
2 cloves of garlic (one for spuds one for steak)
About 1/4 tsp of cayenne pepper (add more or less depending on how spicy you want it)
Rapeseed or olive oil
2 slices of American or processed cheese
For the sauce:
About 4 tbsp of kewpie mayo
1-2 tsp of horseradish cream
About 1 tbsp of ketchup
Salt & pepper
Method:
Trim & slice the steak
First trim off any large chunks of fat, sinew and any silver skin. Then slice the steak against the grain into strips around 1/2cm thick.
Add the steak strips to a bowl, Then add a little oil, black pepper, cayenne pepper and one clove of minced garlic. Then simply mix all the seasonings into the steak and leave to one side until needed.
Make the sauce
Add the mayonnaise, horseradish, pepper, salt & pepper and the ketchup to a bowl and mix until well combined. Cover, and leave in the fridge until needed. This sauce also benefits from sitting for a good half an hour at least to develop the flavours.
Potatoes!
Take a frying pan and add a little oil before putting onto a medium high heat. Once the pan is hot, add your pre cooked new potatoes.
As the potatoes start to fry, gently press the potatoes down with the back of a spoon until they split open and flatten slightly. This creates more surface area to get crispy and absorb flavour.
Next add some fresh rosemary, and squish it up in your hand a little to release the oils. Add a lightly crushed garlic clove, butter and a pinch of salt and pepper.
Continue to fry the potatoes until lightly golden brown and crispy. Leave to one side on a warm plate until needed.
Fry the steak
Just before frying off the steak, if you want your buns toasted do them now by spreading a little butter on the cut side, and placing them face down in a dry hot pan for a minute or so.
Add your steak slices to a frying pan on a medium high heat for about a minute. Add a little salt, then divide the steak into two little piles in the pan and turn off the heat.
Add a slice of processed American burger cheese to the top of each pile and allow the cheese to melt in the residual heat of the pan.
Assemble your steak sandwich
Take the bottom of your toasted buns and add a thin layer of the burger sauce we made earlier.
Next add a few of the seasoned crushed crispy new potatoes.
Next take one of your steak and cheese piles and lay it on top of the potatoes.
Lastly add a few thin slices of red onion, top with a fried egg, whack the lid on and enjoy!
Serve with fries or enjoy on it’s own!
-

The BEST Burger I've ever made!
This is hands down the best burger I've ever made. I call it the swiss double stack with chicken skin bacon. Yes you heard it at the back, CHICKEN SKIN BACON! And I'm going to show you how to make it.
So the idea for this burger came to me in the middle of the night. It was about 2am, I'd already been making burgers all day (for another video) and so I think I went to bed with burgers on my mind. The result was that I came up with this idea for a burger that I had to try straight away. So after some tweaks, this is the end result. The Swiss double stack with chicken skin bacon.
Of course chicken skin bacon is not actually bacon (it just sounds better), it's more like a crackling, much akin to pork rinds. The end result though, is super crispy, salty tasty chicken skins that are just amazing. Even if you don't make the burger, you HAVE to make the chicken skin bacon.
To make my Swiss double stack burger with chicken skin bacon you will need:
Makes 2 burgers
About 400g of beef
4 slices of Swiss Emmental cheese
2 fried eggs
About 4 slices of chicken skin bacon
Sliced red onion
Lettuce
Salt & pepper
Burger buns
For the burger sauce
3 tbsp of mayo
1 tbsp of ketchup
1/2 tbsp of American mustard
2-3 diced pickles
1 tsp of white vinegar
Salt & pepper
About 1/2 tsp of garlic powder
Method:
Make the sauce
Add the mayonnaise, ketchup, mustard, vinegar, garlic, diced pickles, some salt and pepper. Then mix thoroughly and place in the fridge for half an hour so the flavours can meld together.
Make the chicken skin bacon
Line a baking tray with some baking parchment, and lay your chicken skins skin side up on the tray making sure the skins don’t touch each other.
Season each skin with salt and pepper, then take another piece of baking parchment and place on top of the skins. Then lay another tray on top so it presses on top of the parchment covered skins.
Bake them in an oven on about 180°c for 15-20 minutes until crispy and nice and golden brown. Keep an eye on them though, as they can burn quite easily so check on them halfway through.
Once cooked, simply take them out of the oven, and place on a wire rack or plate to cool, ready for later.
Make your burger patties
Take the minced beef and divide into four 100g balls. Next press each ball into a patty shape making sure it’s a good ½ inch bigger than the diameter of your bun to allow for shrinkage.
At this point toast your buns by placing a little butter in a hot pan and placing your bun halves cut side down into the pan. Then toasting for a minute or so until golden brown.
Fry the burgers
Clean out the pan you used to toast buns with some kitchen paper and place back on a medium high heat.
Once the pan is hot, season each side of the patties and add to the pan and fry each side for about two minutes until a crust forms on each side and they are cooked all the way through.
For the last minute of cooking, add a slice of emmental cheese to each patty, and stack one on top of the other. Place a lid or cloche over the top of the pan to let the steam gently melt the cheese.
Assemble your burger
Add some of the burger sauce to the bottom of your toasted bun. Next some lettuce and sliced red onion.
Next stack your double patty on top, then add a nice runny fried egg and of course a couple of pieces of that crispy chicken skin bacon!
Finally add a little more sauce to the lid and place it on top. Pop that runny yolk and enjoy!
-

The smash burger is nothing short of AMAZING!
Smash burgers are as the name suggests...smashed, into the hot searing heat of the pan. They are delicious and easy to make, and I'm going to show you how. To make a smash burger you will need a few tools. These are not your average burger patty, and so will require a slightly different way of thinking. Usually, you wouldn't dream of mashing a burger patty into the pan, for fear of all the juices coming out. For a smash burger though, that's exactly what you need to do.
You'll want to get a heavy sturdy metal spatula, and a good heavy pan to fry the smash burgers in, preferably cast iron. What happens when you press down on the meat, is you force the mix to come into contact with the fierce heat of the pan, meaning it cooks quicker. But you also get that all important maillard reaction, with all those crispy bits and dark caramelised edges. A smash burger is a thing of beauty, and made properly, you will love em!
To make my smash burgers you will need:
Makes 2 burgers
4 x 100g balls of 80/20 minced beef
4 slices of processed American cheese
2 large burger buns
Shredded iceberg lettuce
Diced white onion
Sliced gherkins (pickles)
Salt & pepper
Small knob of butter
American mustard for top bun
For the sauce
4 tbsp of good mayonnaise
1/4 tbsp of green pickle relish
1/4 tbsp of American mustard
1/4 tbsp of white distilled vinegar
1/2 tsp of onion powder
1/2 tsp of garlic powder
1/2 tsp of paprika
Method:
Make the sauce
Simply combine all of the sauce ingredients in a bowl and mix well. Then place the sauce in the fridge until ready to use.
Make the burgers
Split 400g of good quality beef mince into 4 × 100g balls. Use mince that has a good fat content of around 20%.
Get a frying pan on a really high heat, making sure your kitchen has plenty of ventilation as it will get smoky!
After around 45 seconds, take a spatula and get right under the patty and flip it over. Make sure you get good contact with the burger to lift it off and not leave any of that amazing crust behind.
As soon as you have flipped the patty, lay your cheese slice on top of each patty, then turn the heat off and cover the top of the pan with a lid or plate and just leave for about 20 seconds for the cheese to melt.
Assemble your chicken burger
Take the bottom half of your toasted bun and add a layer of burger sauce, then some shredded iceberg lettuce and a little diced white onion.
Lay two of the cheese covered patties on top of the lettuce and add some sliced pickles. Finally add a little bit of American mustard to the underside of the top bun, pop it on top and enjoy!
Serve with fries or enjoy on it’s own!
-

This Garlic butter chicken burger is INSANE!
We know that garlic butter and chicken goes well together, but how can you take two already delicious things to the next level? Well what you do, is you slap them in a burger with cheese and other delicious stuff, that's what you do! So I have been thinking about this for a few days now. I just kind of ended up like a stuck vinyl record, constantly thinking about the same thing over and over and over again, until well...I just had to make it. So here it is, my garlic butter chicken cheeseburger. Go make it!
To make my garlic butter chicken burger you will need:
Makes 2 burgers
2 medium sized chicken breasts
2 Brioche buns
2 garlic cloves
About 60g of room temp butter
A small handful of parsley
Juice of about 1/4 of a lemon
Salt & pepper
Pie D'Angloys cheese (brie, camembert, reblochon also works well)
Little gem lettuce
Mayonnaise
Extra lemon juice for basting the chicken
Sliced tomatoes
Method:
Make the garlic butter
Add the softened butter to a bowl and mince in the garlic. Add the freshly chopped parsley, a little lemon juice and a pinch of salt and pepper. Mix it up nicely and that’s your garlic butter ready. Roll it up in some clingfilm and pop it in the fridge to firm up for half an hour or longer.
Prep the chicken
Take the chicken breasts and trim them of any cartilage, sinew and not very nice bits.
Next lay each breast in-between two sheets of cling film and bash them out flat until they are an equal thickness. You can use a meat mallet, rolling pin or use the bottom of a heavy saucepan. Once they are the thickness of about a £1 coin, place them to one side for later.
Do your prep
Get your buns toasted, slice the tomatoes, lettuce and the cheese. If you want any other toppings make sure to get those ready too.
Make the chicken burger
Start by seasoning your chicken breasts on both sides with salt and pepper then get them into a medium hot pan with a little oil.
Fry the chicken breasts for around two minutes each side. They shouldn’t take too long to cook since they have been beaten out flat.
Once almost cooked through, turn the heat down to it’s lowest setting and add a few slices of your garlic butter over the top. It should gently melt over the chicken and not vigorously fry in the pan.
Gently baste the chicken with the butter and squeeze over some lemon juice.
Then lastly add a few slices of the Pie D’Angloys cheese on top of each chicken breast, and watch it slowly melt in the residual heat.
Assemble your burger
Add some mayonnaise to the base of your toasted bun, then some lettuce before adding your chicken fillet.
Top with a little more garlic butter, some slices of fresh in season tomato, whack the lid on and enjoy!
Serve with fries or enjoy on it’s own!
-

Spicy lamb burger with tzatziki (ish) sauce | burger recipes
You know when you just crave a burger, and you just have to have it and nothing else will do? This was me the other day. I knew I wanted a burger, but I wanted something a bit different. Not like banana and mustard kind of different, more spicy lamb burger with a tzatziki sauce kind of different, and this is the baby I produced.
The thing with lamb is it's nice and fatty. This lends itself well to a burger where you want a nice crispy crust, but is still nice and juicy on the inside. You need to get good lamb mince for this OK. no going the frozen aisle and buying the cheap rubbish stuff, have something else instead. You can also switch up the spices and add your own flavours. Want more heat? Then chuck in some fresh jalepenos, want more cheese? Then add it, it's your burger after all. I'm just the meat messiah, guiding you on a burger pilgrimage.
To make my spicy lamb burgers with tzatziki (ish) sauce you will need:
450g of lamb mince
About 1/4 tsp of cayenne (more if you want it hotter)
1/2 tsp of cumin
1/2 tsp of smoked paprika
Salt & pepper
Sauce
150g of greek yoghurt
About 2 tbsp of chopped cucumber
About 8 mint leaves
2 tsp of honey
About 1 tbsp of lemon juice
Salt & pepper
Burger buns and of course the toppings of your choice. I used lettuce, piquante peppers and some sliced red onion.
Method:
Prepare the lamb patties
Place minced lamb in a bowl.
Season with salt and pepper.
Add smoked paprika, ground cumin, cayenne pepper, and grated garlic.
Mix thoroughly by hand until spices are evenly incorporated.
Divide mixture into four equal portions, shape into balls, and flatten into patties slightly larger than your burger buns.
Chill patties in the fridge while you make the sauce.
Make the mint yogurt sauce
In a bowl, combine Greek yogurt, chopped mint, diced cucumber, lemon juice, honey, and a pinch of salt and pepper.
Mix well, then refrigerate for at least 30 minutes to let the flavours meld.
Cook the patties
Heat a little oil in a pan over high heat.
Season patties lightly with extra salt if desired.
Fry for 1–2 minutes per side, or until a crust forms and they are cooked through to your liking.
Remove and let rest for a minute.
Assemble the burgers
Spread some mint yogurt sauce on the bottom half of the toasted bun.
Add lettuce, the lamb patty, sliced red onion, and picante peppers.
Spoon a little extra sauce on top, then cap with the bun lid.
Serve and enjoy
Serve immediately while warm, with extra sauce on the side if desired.
💡 Optional: Add feta cheese for a salty, tangy twist that complements the lamb and mint sauce perfectly.
-

Double cheeseburger | Fast food copycat recipes
The double cheese burger is iconic with those big yellow arches. It's simple, but it does taste good. I very rarely eat Mcdonald's though, as for some reason, it plays havoc with my gut. I normally feel sick, and just generally not very good at all after having one. So I've come to the conclusion, that the only way to remedy this problem is to make my own. Now when it comes to a good cheeseburger, I am very much a purist. I've seen far too many gourmet type burgers, with all sorts of things piled on them, like onion rings, blue cheese, even foie gras....FOIE GRAS! I'm of the opinion that simplicity works best with a cheeseburger, and the question I would ask myself when thinking about adding loads of extras is...will it make it better, and if the answer is 'I'm not sure', then it probably won't. American processed cheese is the cheese of choice for any self respecting cheeseburger, as it just works, plain and simple. Yes you could add all sorts of different cheeses, but it just isn't the same. Yep, I know it's not real cheese, but it is good.
To make my McDonald’s copycat double cheeseburger you will need:
450g (1lb) of really high grade steak mince (ground beef)
1/2 a small white onion
1-2 Gherkins (pickles)
4 slices of processed cheese
2 soft white burger buns
Ketchup
American mustard
Salt & pepper
Method:
Prepare the burger patties
Place the beef mince into a bowl and season with salt & pepper, then mix well.
Divide the beef into equal sized balls, then press out into patties making sure they are larger than the buns to allow for shrinkage.
Place the patties in-between pieces of baking paper and place in the fridge for about 20 minutes to firm up.
Prep your toppings
Slice your onion, diced your pickles and toast your buns. Make sure everything is ready to hand, as this will make your life so much easier when making the burgers.
Cook the patties
Heat a little oil in a pan over high heat.
Season patties lightly with extra salt if desired.
Fry for 1–2 minutes per side, or until a crust forms and they are cooked through to your liking.
Add a slice of cheese to each patty, and stack one on top of the other. Turn off the heat and leave the cheese to melt in the residual heat.
Assemble the burgers
Load your patties on to the base of your bun.
Add ketchup, American mustard, the onions and pickle slices.
Then pop the lid on and it’s done!
Serve and enjoy